Exploratory Data Analysis of Resistance Spot Welding for Small Lot Manufacturing

A small-lot manufacturer of mission-critical components is interested in improved process understanding and the ability to monitor part-to-part process repeatability during resistance spot welding. This particular resistance welding process is somewhat unique in that coalescence is achieved primarily through diffusion. Radiography, ultrasonic, eddy current, and electrode displacement all rely on phase transformations of the material as a means of inspecting bond quality. Consequently, unlike other traditional resistance welding processes, inspecting weld quality through various post-process non-destructive techniques is difficult due to the lack of melting.
The resistance weld is the last step in the fabrication process of the manufacturer's complex assembly. Most importantly, the reliability of the weld is paramount to the product’s safety and performance. Verification of weld quality is currently accomplished by two means: (a) welds are periodically destructively tested and evaluated metallographically in order to “bookend” the quality of a small lot of production parts and (b) radiography is applied to every weld to identify any anomalies through key weld attributes, such as closure length, extrusion ratio, and weld thickness.
The manufacturer is interested in additional ways of assessing the quality of their resistance weld. The manufacturer conducts their resistance welding operations in a small-lot production environment where process and environmental variability are minimized through manufacturing best practices. Nevertheless, given the critical and sensitive nature of this weld, issues such as material chemistry and material properties variability, operator error, and surface cleanliness are a concern to the manufacturer. Therefore, a real-time process monitoring approach is of considerable interest.
In an attempt to better understand their process capabilities, the manufacturer conducted an experimental matrix at five different heat inputs with three different material hardness properties. Duplicates were made at each unique condition. The parameters are listed below.
- Current, [A]: 3200, 3450, 3750 (nominal), 4000, 4400
- Hardness: HRC29 (as received), HRB64 (partially annealed), HRB94 (fully annealed)
- Force, [lbs]: 1250
Resistance welds were made using a commercial controller under constant voltage control. Weld current was monitored with an inductive pickup current meter, while the weld voltage was adjusted manually at the transformer to provide the input power level. The resistance weld consists of three distinct steps:
- Squeeze: After fixturing the workpiece, a preload of 1250 lbs was applied to the tube. The target force was achieved by ramping initially at 6.25 psi/s. Upon reaching 100 lbs of the target force, the ramp was reduced to 0.25 psi/s.
- Resistance test: Prior to welding, a 3 A current was sent through the workpiece and the response voltage was measured. The test was used, primarily, to ensure that the correct fixtures are in place, that the preload has been applied, and that all the preliminary conditions have been met.
- Weld: Each weld consisted of 12 cycles of alternating current with no phase angle cutoff or additional control. Electrode force was fixed at nominally 1250 lbs and was kept constant by monitoring and adjusting the nitrogen gas piston pressure at the weld station.
Process data were collected by the manufacturer's in-house data acquisition system. Voltage, current, force, and displacement were captured at a sampling rate of 10kHz/channel. This data along with the controller's summary data were imported into InnerVoice post-process. The data were organized into 15 projects representing the 15 unique weld conditions.
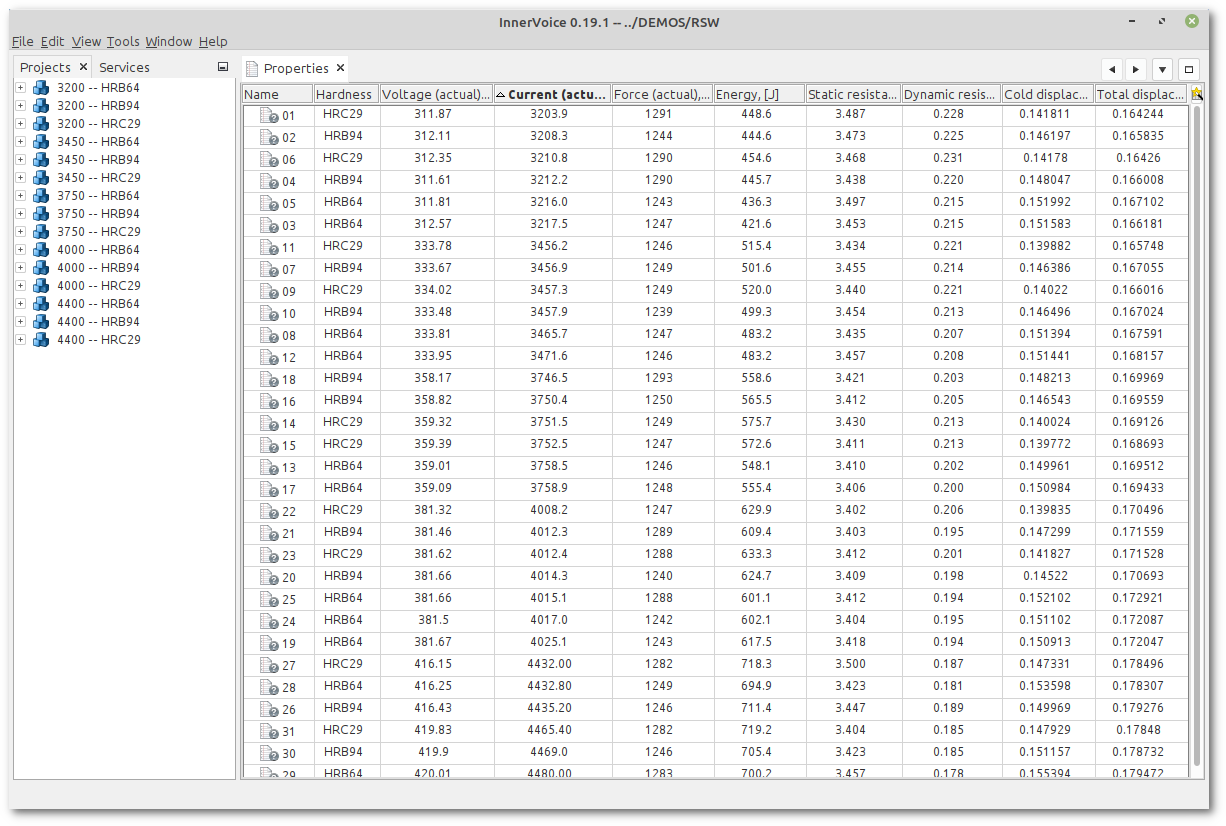
Thirty one welds were made. The controller's key performance statistics are summarized in the following table.

Most commercial resistance weld monitors condense key performance statistics into a single value. Unfortunately, doing so results in broad generalizations and over simplifications of the process performance and thereby only captures large and obvious deviations in the process behavior. The process performance data recorded by this commercial welder only provided enough information to differentiate welds into different heat inputs.
Capturing a finer resolution of the process performance can reveal greater insight into the process dynamics and achieve deeper understanding into the process behavior. However, such fine grained feedback comes with the additional burden of manipulating, transforming, and visualizing the more complex and high-dimensional data space. Prior to InnerVoice, the manufacturer relied upon simple spreadsheet charting and analysis to explore the time-domain process data. Performing simple calculations, such as applying a low-pass filter, on the time-domain data can be cumbersome. Applying more complex tasks, such as calculating the dynamic resistance, are untenable with a spreadsheet.
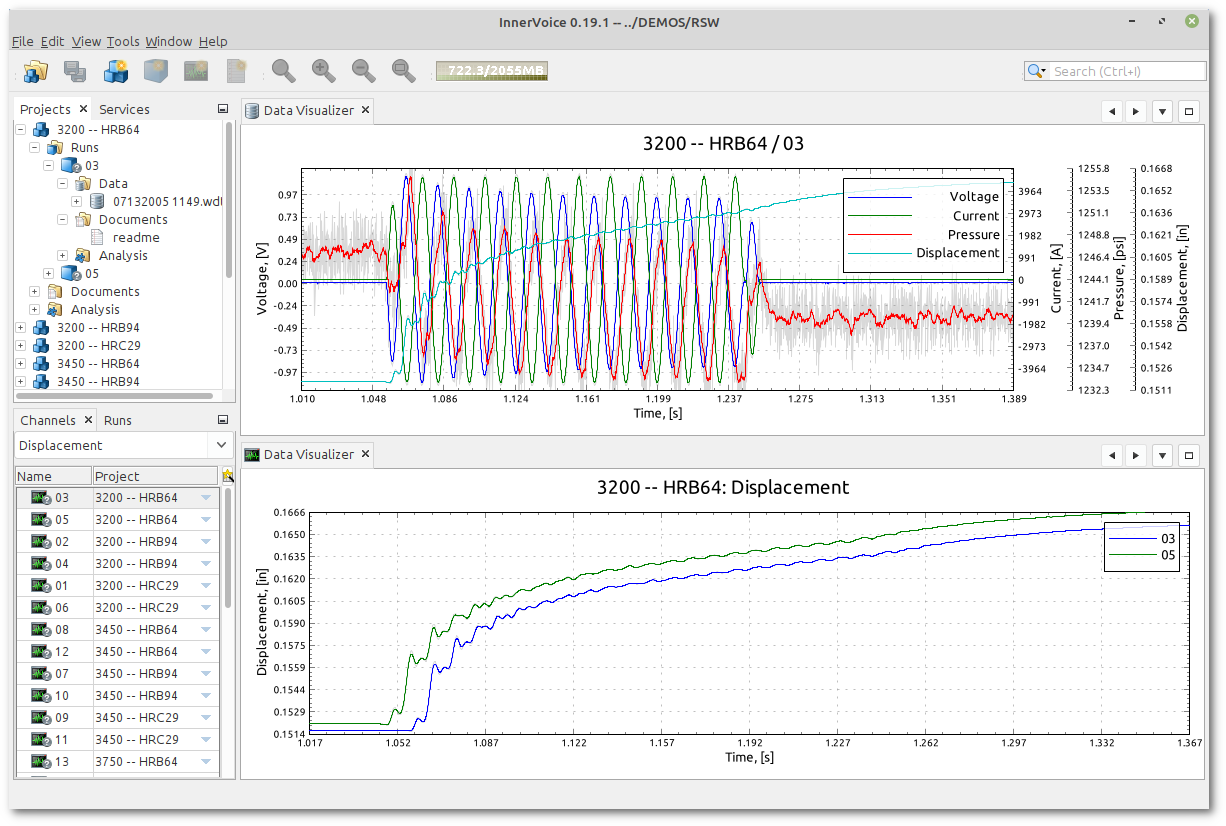
InnerVoice automates and simplifies the task of organizing, visualizing, and exploring the raw process data. It was designed with the assumption that not all manufacturing process data is perfect. Specifically, manufacturing process data can be noisy, ill-defined, and corrupt. The screenshot below illustrates the visualization of the raw process data filtered slightly to enhance the nominal DC trends in the pressure signal.

Based on the above screenshot, what becomes readily apparent is that the raw data alone are ill-defined, dense, and difficult to interpret. As a result, feature extraction is employed to reduce the data density while preserving, enhancing, and ultimately revealing patterns and relationships in the process data. Feature extraction involves implementing signal processing and data analysis techniques that explore and, potentially, improve upon the "raw" data. The task of feature analysis is normally a domain-dependent operation.
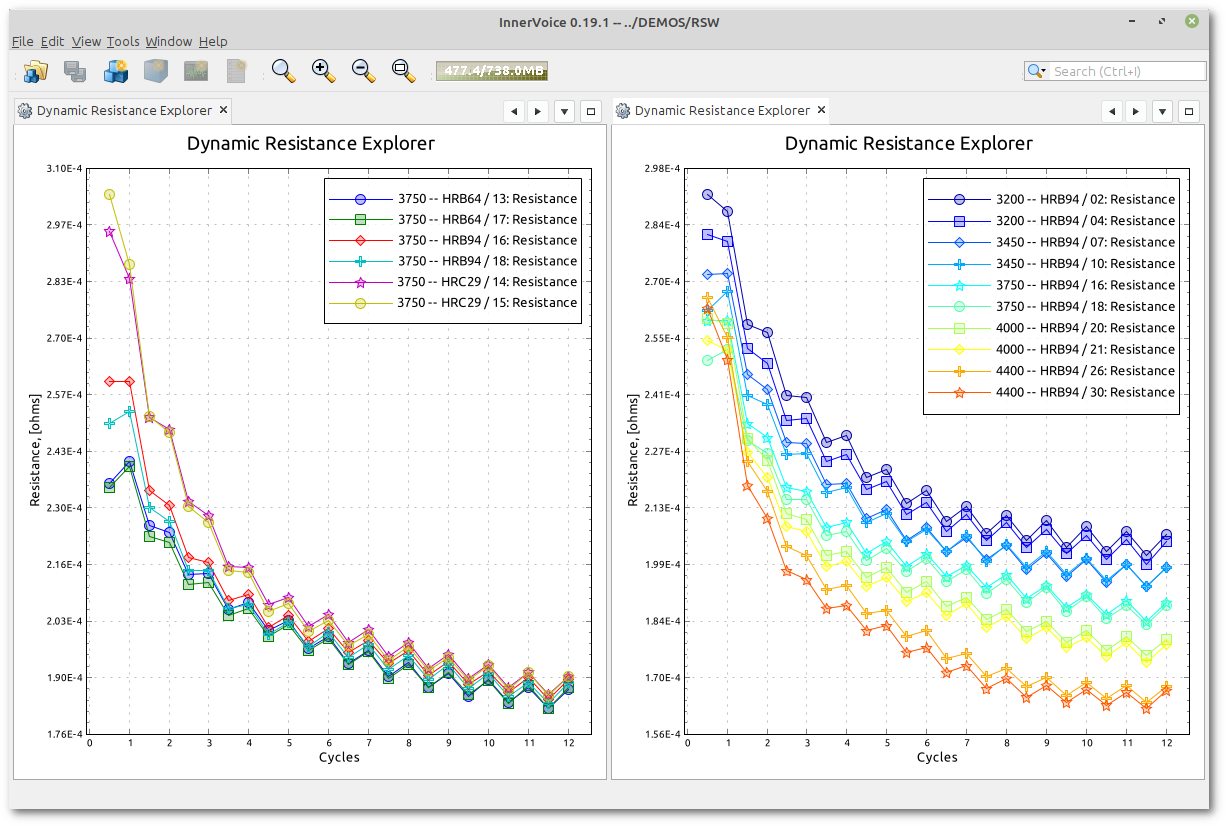
For resistance welding, the dynamic resistance is a well-known and well-accepted metric that can provide feedback regarding the quality of the weld along with the state of the welding system (for example, electrode wear). InnerVoice offers a "Resistance Welding Process" plug-in that automates the task of calculating the dynamic resistance. The screenshot below illustrates InnerVoice's "Dynamic Resistance Explorer" capability.

The above screenshot contains two charts. The chart on the left compares the dynamic resistance signatures for three different material hardnesses welded under the same heat input conditions. Notice that the initial few cycles of dynamic resistance bear out the differences in the three material hardnesses. Furthermore, the shape of the decay curve from the initial resistance to the steady-state resistance is different for the different material hardnesses. The chart on the right compares the dynamic resistance signatures for the same material hardnesses (in this case, HRB94) welded under the five different heat inputs. Notice that the initial resistance and the final steady-state resistance are different for the different heat inputs, while the shape of the decay curve from initial to steady-state is approximately the same.
As illustrated above, the feature extraction effort transforms the voltage and current signals into a single dynamic resistance signature. This signature reduces the data density from thousands of ill-defined data points to a 24-point curve that contains structure allowing an end-user to discriminate between material hardness variability or heat input. However, the dynamic resistance offers limited discriminatory capabilities when both hardness and heat input are considered together. Decoupling requires further transformation.
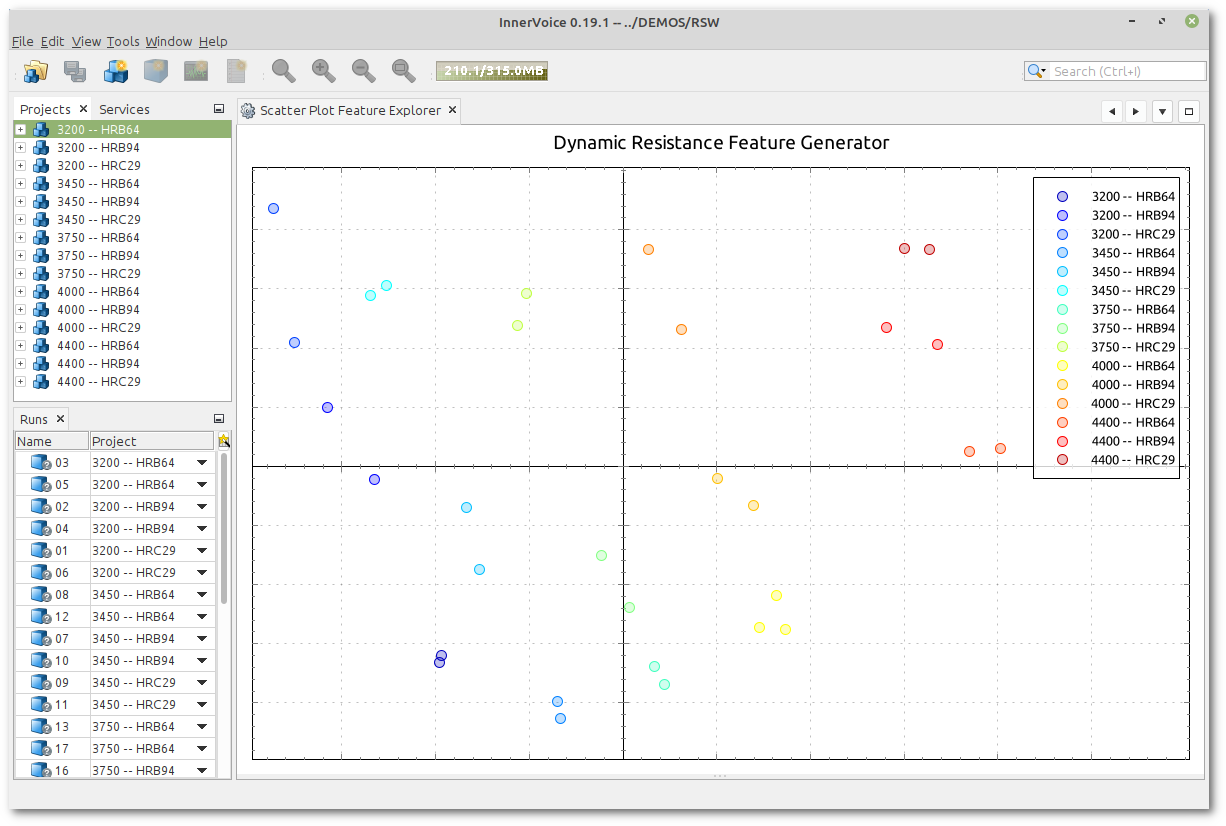
The "Scatter Plot Feature Explorer" from InnerVoice can further decouple complex signals and reveal structure within a high dimensional space. The explorer applies a dimensional scaling technique to transform the high dimensional space into a lower dimension that is amenable for viewing. The resulting view relies upon the pattern recognition power of human vision to identify structure that may exist within the multivariate data. The screenshot below illustrates the "Scatter Plot Feature Explorer" capabilities by plotting the first two dimensions from the transformed dynamic resistance data.

Scanning from left to right within the above scatter plot, one can see the increasing heat input groupings. Each heat input nominally occupies a vertical section of the chart. Further, within each heat input grouping, one can see the three different hardnesses spatially organized in close proximity to each other. Additionally, scanning from top to bottom, one can see the decreasing hardness groupings.
In summary, the main purpose of exploratory data analysis is to look at data before making any assumptions. InnerVoice's graphical tools allow a manufacturing engineer to perform initial investigations on the data to discover and understand patterns, detect outliers or anomalies, and test assumptions. InnerVoice simplifies this task by providing exploratory data analysis tools that answer the question, "Can I see (and hence monitor) variability in my process that impacts product quality?"
The dimensional scaling technique illustrated above is able to transform the dynamic resistance to a format such that multiple conditions can be discriminated within a reduced dimensional space. Such an approach lays the foundation for a distance- or density-based classifier that can provide real-time process health feedback. InnerVoice offers several classifiers that are designed to monitor manufacturing processes where the in-process relationships are ill-defined, the dynamics are complex, and the signals are tightly coupled.
Contact us for more information about how InnerVoice can solve your manufacturing process monitoring needs.
