The Importance of In-Process Monitoring for Rotary Friction Welding

Variability and uncertainty will always exist at some level in a manufacturing process. As a result, many manufacturers devote more time and resources to tightening tolerances, ensuring QA/QC compliance, and increasing post-process destructive and non-destructive testing, yet very little time is spent understanding the relationship between the in-process physical behaviors and the repeatability and quality of the manufacturing process itself. Recently, manufacturers are realizing that their manufacturing processes are data-rich environments that have gone largely untapped. This article reviews a recent research paper that characterizes the inherent variability of an inertia friction welding machine tool and illustrates the importance of real-time, in-process monitoring.
In 2021, a research group out of Rolls-Royce published their findings regarding the instrumentation and analysis of an industrial inertia friction welder [1]. The motivation for their work was based on the premise that rotary friction welding is commonly viewed under ideal conditions in which the two workpieces are brought together in perfect contact and under ideal loads and that the machine tool and fixturing are rigid and do not experience compliance. Unlike previous research, their interest was to capture a more comprehensive view of the process by analyzing the tightly-coupled, in-process dynamics between the workpiece, the tooling, and the machine structure itself. The purpose of their research was to gain a better understanding of how the compliance of the machine tool and fixturing under both nominal and off-nominal welding conditions can affect the quality of the weld and the repeatability of the process.
In an effort to accurately capture and understand the role of the dynamic behavior that the machine tool and fixturing play in a real-world, inertia friction welding process, the authors instrumented the spindle and the fixture with the following sensors:
- A hall effect speed sensor captured the spindle's angular velocity with a high degree of precision.
- A triaxial accelerometer was mounted to the fixture to capture vibrational behavior.
- Three displacement transducers (LVDTs) and two laser sensors were installed to measure axial and radial runout.
- Strain gauges were mounted and configured to capture both axial load and torque.
Once instrumented, a series of baseline rundown tests were conducted to capture the behavior of the spindle when non-external loads are applied and where the two workpieces are not in contact. With the fixture side sufficiently close, the spindle's radial and axial runout were measured by the lasers and LVDTs, respectively. The behavior of the system was then captured and analyzed during welding. Three key take-aways were observed from their analysis and are presented next.
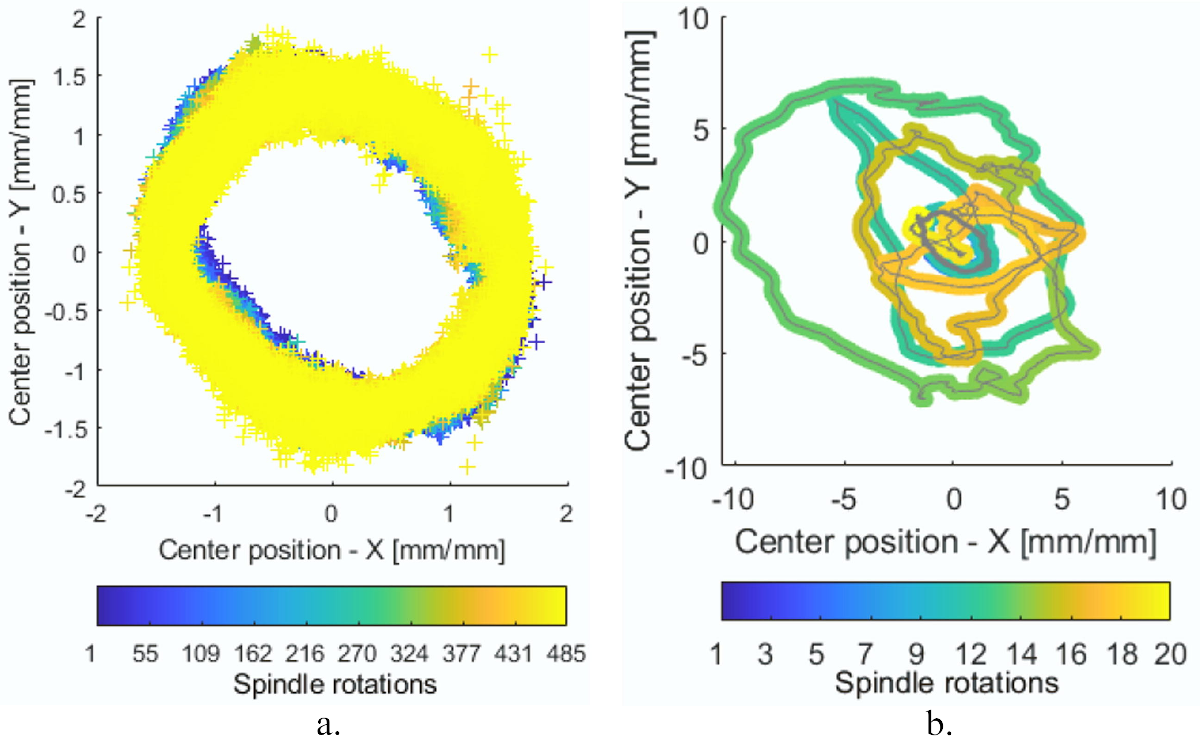
The following figure illustrates the authors' radial runout of the spindle's center position for both a rundown test (subfigure a) and a weld test (subfigure b). Notice the distorted orbit and a five-times increase in amplitude for the weld test compared to the rundown test.

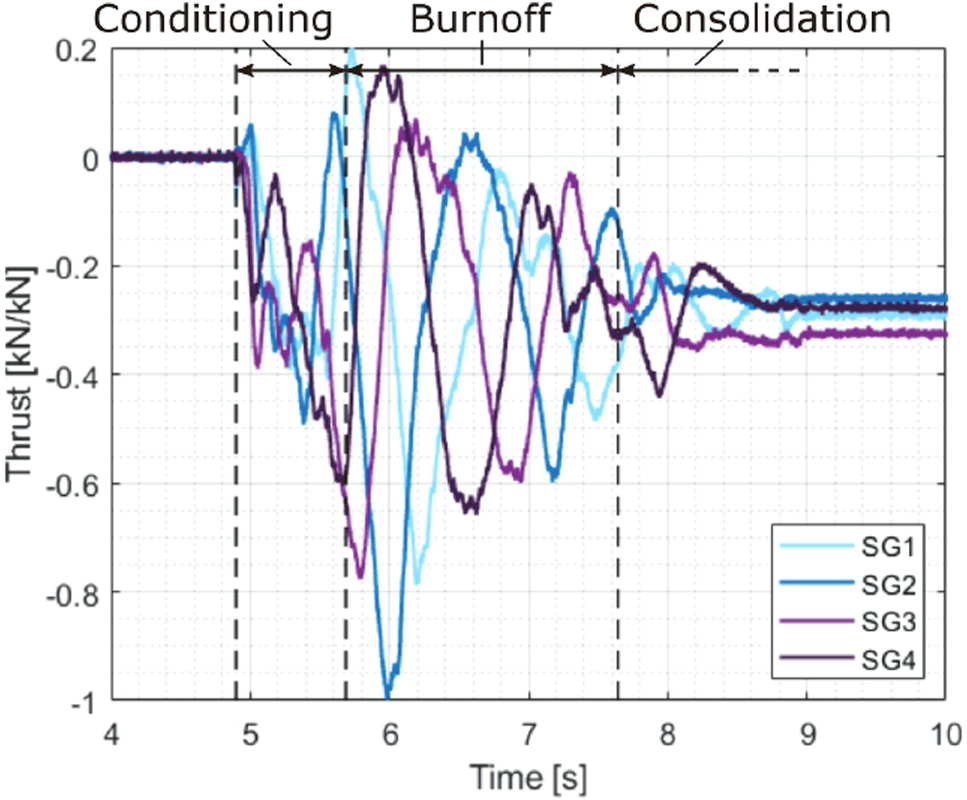
In addition to the radial runout measured by the two laser sensors, the following figure captures the axial load measured by the four axial strain gauges during a weld test. Notice the opposing strain gauges (that is, SG1-SG3 and SG2-SG4) exhibit similar but opposite magnitudes which suggest bending stresses present during welding. The authors hypothesize that the strain gauges are not only capturing axial load and thrust present during the weld but also radial components that affect runout.

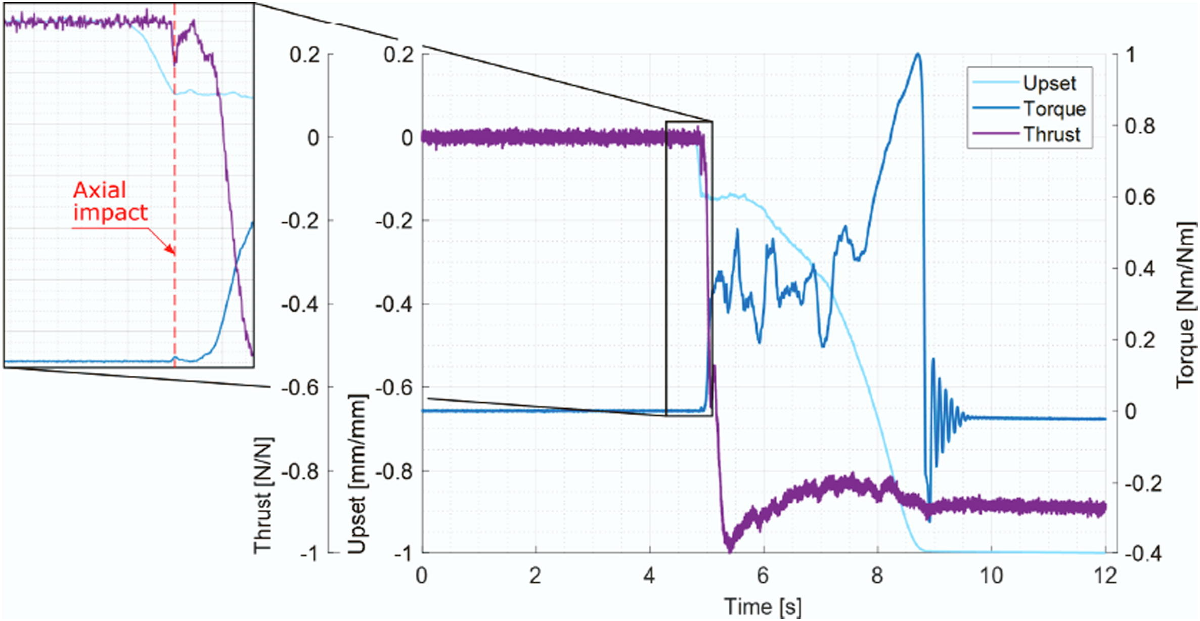
Finally, the following figure illustrates the oscillatory behavior that can occur as a result of the two impulse responses from the welding process. The first impulse occurs at the moment of impact, while the second impulse occurs at the moment of seizure when the torque rises to a second peak as speed approaches zero. Both impulses cause an oscillatory response that can be measured in the machine structure. Although reporting on the existence of oscillatory behavior during rotary friction welding is not new, the authors suggest that the system response can be affected depending on how this first contact occurs.

In summary, simplifications in a machine tool model are sometimes necessary for system behaviors that are too complex to model accurately. In rotary friction welding, treating the machine tool and fixturing as a rigid, non-bending component is one such example. In this research, the authors set out to measure and model these previously held assumptions and therefore evolve from a simplified and idealized representation of the machine tool to a static model involving a compliant, non-rigid structure. From their analysis, the authors are able to replace previously held idealized assumptions of rigidity with dynamic representations of compliance for the inertia friction welding machine and its tooling. In addition to these modeling improvements, the authors' instrumentation and analysis revealed the following:
- The axial and radial runout during the rundown tests were in phase with the spindle's speed and constant in magnitude. However, during welding, the axial and radial runout loses its periodicity and exhibits larger and more irregular magnitudes.
- The strain gauges captured not only axial load and thrust components but also radial components that can be contributing to the runout behavior.
- The vibrational analysis revealed that the initial impact and the moment of arrest can reduce control of the process and impose abnormal stress on the weld.
The research group at Rolls-Royce was interested in eliminating assumptions and hence uncertainty in their process models by capturing the dynamic behavior of the machine structure and tooling. Their research also reinforced the notion that inertia friction welding and rotary friction welding, in general, are data-rich environments for assessing process repeatability and consistency. Many of the behaviors that are directly measured on the machine structure and the fixturing manifest themselves in the welding process data itself.
InnerVoice was designed to extract product- and process-relevant features from the manufacturing process data and provide real-time process quality feedback. Moreover, InnerVoice can be readily expanded to collect additional data streams from external sensors when the customer's requirements warrant it. Contact us to learn more about how InnerVoice can help solve your manufacturing quality assurance needs.
--
[1] Raimondi, L., Bennett, C.J., Axinte, D., Gameros, A. and Stevens, P.A. "Development of a novel monitoring system for the in-process characterisation of the machine and tooling effects in Inertia Friction Welding (IFW)." Mechanical Systems and Signal Processing, 156, 2021: 107551.
